개요
Django는 python으로 작성된 오픈 소스 웹 애플리케이션 프레임워크다.
설치
CentOS 6.5
의존 패키지 설치
$ sudo yum groupinstall "Development tools"
$ sudo yum install zlib-devel bzip2-devel openssl-devel ncurses-devel sqlite-devel readline-devel tk-devel gdbm-devel db4-devel libpcap-devel xz-devel
python 설치
https://www.python.org/downloads/source/ 사이트에서 python 소스 코드를 다운로드 한다.
$ wget https://www.python.org/ftp/python/3.4.2/Python-3.4.2.tar.xz --no-check-certificate
$ tar xvf Python-3.4.2.tar.xz
$ cd Python-3.4.2
$ ./configure
$ make && make install
Django 설치와 Quick Start
다음과 같이 pip 명령어를 이용해 Django를 설치 할 수 있다.
$ pip3.4 install Django
https://www.python.org/downloads/source/
방화벽 해제
$ service iptables stop
새로운 프로젝트 생성을 위해 다음과 같은 절차로 실행한다.
$ django-admin.py startproject tutorial
$ cd tutorial
$ python3.4 manage.py runserver 0.0.0.0:8000
웹브라우저에서 접속해보면 다음과 같은 메시지를 확인 할 수 있다.
$ A server error occurred. Please contact the administrator.
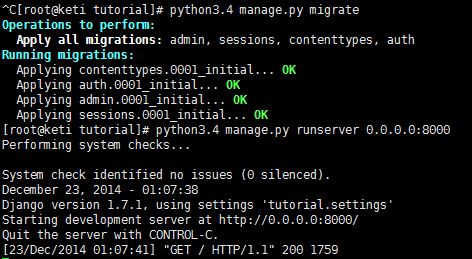
migration을 해주기 위해 다음을 실행한다.
$ python3.4 manage.py migrate
$ python3.4 manage.py runserver 0.0.0.0:8000
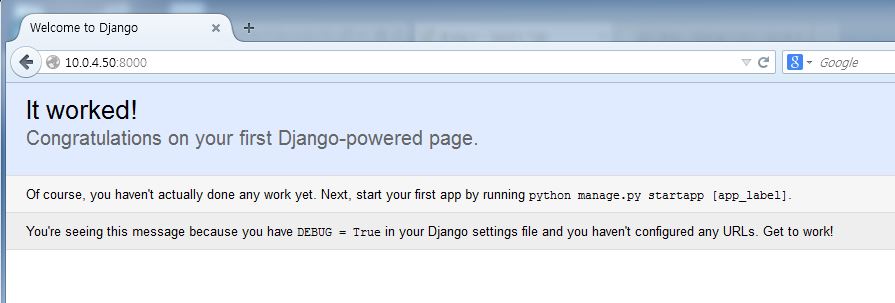
다시 접속을 시도하면 다음과 같이 정상 결과를 확인할 수 있다.
프로젝트 만들기
blog라는 프로젝트를 만들어 보자.
$ django-admin.py startproject blog
$ cd blog
$ ls
blog  manage.py
디렉토리 구조를 보면 다음과 같다.
.
├── blog
│   ├── __init__.py
│   ├── settings.py         # 각종 설정이 들어있는 파일
│   ├── urls.py             # URL을 연결해주는 파일
│   └── wsgi.py             # 웹 서버 게이트웨이 인터페이스
└── manage.py               # 프로젝트 관리 파일
위와 같이 만들고 일단 서버를 동작시켜 보자.
$ python manage.py runserver 0.0.0.0:port
port는 임의로 입력한다. 필자는 8000번 포트를 사용하겠다.
$ python manage.py runserver 0.0.0.0:8000
Performing system checks...

System check identified no issues (0 silenced).

You have unapplied migrations; your app may not work properly until they are applied.
Run 'python manage.py migrate' to apply them.

January 28, 2015 - 03:55:41
Django version 1.7.1, using settings 'blog.settings'
Starting development server at http://0.0.0.0:8000/
Quit the server with CONTROL-C.
서버를 동작시키면 아직 migration이 안 되어 있어 warning이 출력되지만 서버는 동작한다.
App 만들기
이번엔 blog 프로젝트 하위에 App을 만들어 보자.
$ django-admin.py startapp helloworld
위와 같이 실행하면 blog 프로젝트 디렉토리에 다음과 같은 디렉토리 구조로 helloworld가 생성된다.
.
├── blog
│   ├── __init__.py
│   ├── __pycache__
│   │   ├── __init__.cpython-34.pyc
│   │   ├── settings.cpython-34.pyc
│   │   ├── urls.cpython-34.pyc
│   │   └── wsgi.cpython-34.pyc
│   ├── settings.py
│   ├── urls.py
│   └── wsgi.py
├── db.sqlite3
├── helloworld
│   ├── admin.py
│   ├── __init__.py
│   ├── migrations
│   │   └── __init__.py
│   ├── models.py
│   ├── tests.py
│   └── views.py
└── manage.py
blog 프로젝트에 helloworld를 추가하기 위해 blog/settings.py를 수정한다.
$ vi blog/settings.py
위 파일에서 다음 부분을 수정한다.
INSTALLED_APPS = (
    'django.contrib.admin',
    'django.contrib.auth',
    'django.contrib.contenttypes',
    'django.contrib.sessions',
    'django.contrib.messages',
    'django.contrib.staticfiles',
    'helloworld',
)
위와 같이 helloworld를 추가하여준다.
그리고 helloworld 앱 디렉토리에서 views.py 를 수정하여 간단한 텍스트를 표시해보자.
$ vi helloworld/views.py
views.py 파일에 다음과 같은 내용을 입력한다.
from django.http import HttpResponse

def hello(request):
    return HttpResponse("Hello, World!")
위와 같이 view를 설정하고 urls.py 를 수정하여 매핑 작업을 한다.
$ vi blog/urls.py
from django.conf.urls import patterns, include, url
from django.contrib import admin

urlpatterns = patterns('',
    # Examples:
    # url(r'^$', 'blog.views.home', name='home'),
    # url(r'^blog/', include('blog.urls')),

    url(r'^admin/', include(admin.site.urls)),
    url(r'^helloworld/', 'helloworld.views.hello'),
)
위와 같이 urls.py에 helloworld 주소와 그에 매핑되는 view를 설정한다. ^ 기호의 의미는 서버가 실행되는 호스트 주소 앞 부분을 명시한다.
http://treetale.iptime.org:8000/helloworld
위 주소에서
http://treetale.iptime.org:8000/
여기까지를 나타내는 것이다.
위 소스 코드에 보면 helloworld/ 주소를 'helloworld.views.hello' 와 매칭 시키는 데 helloworld는 만들었던 App의 이름이고 views는 views.py를 hello는 views.py에 선언된 hello 메소드를 나타낸다.
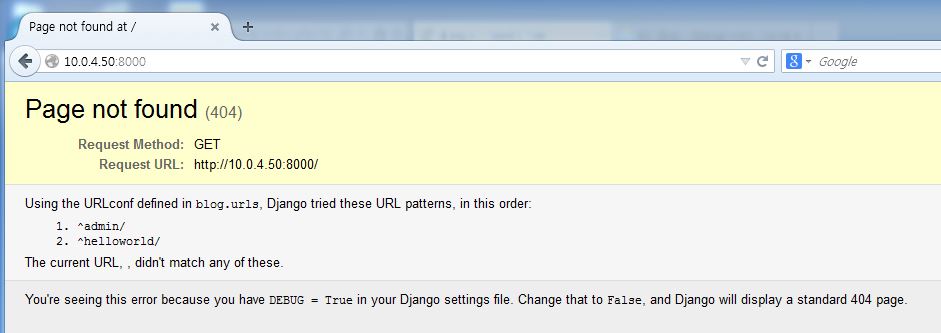
사이트에 접속하면 다음과 같에 페이지를 찾지 못한다고 오류 메시지가 출력된다.
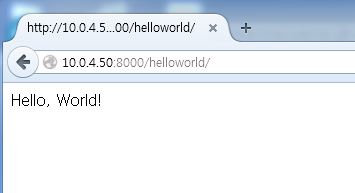
그리고 /helloworld/ 주소로 접속하면 다음과 같이 정상적으로 메시지가 출력되는 것을 확인할 수 있다.
App 또한 자기 urls.py 파일을 갖고 여러 url을 포함 할 수 있다.
즉, helloworld/korean 또는 helloworld/japanese 이런식으로 korean과 japanese URL을 하위로 갖는 구조가 될 수 있다. 이를 위해 blog 프로젝트를 기준으로 blog → urls.py(helloworld) → helloworld의 urls.py가 include 되어 helloworld 내의 urls.py가 호출되는 구조.
직접 적용하여 보면 다음과 같은 형태이다. 먼저, blog/urls.py 를 다시 수정한다.
$ vi blog/urls.py
from django.conf.urls import patterns, include, url
from django.contrib import admin

urlpatterns = patterns('',
    # Examples:
    # url(r'^$', 'blog.views.home', name='home'),
    # url(r'^blog/', include('blog.urls')),

    url(r'^admin/', include(admin.site.urls)),
    url(r'^helloworld/', include('helloworld.urls'),
)
그리고 helloworld 디렉토리에 urls.py 를 생성하여 준다. 기존에 있는 blog/urls.py를 복사하여 사용하자.
$ cp blog/urls.py helloworld/urls.py
$ vi helloworld/urls.py
위 파일을 다음과 같이 수정한다.
from django.conf.urls import patterns, include, url
from django.contrib import admin

urlpatterns = patterns('',
    url(r'^$', 'helloworld.views.hello'),
)
Template 만들기
우선 templates 파일들이 들어갈 디렉토리와 같단한 html 파일을 만들자.
$ mkdir templates
$ vi templates/index.html
안녕하세요. 저는 {{first}} 이고, {{second}}의 {{third}} 입니다.
새로 만든 template을 blog 프로젝트가 사용할 수 있도록 template 디렉토리를 등록하여 준다.
$ vi blog/settings.py
TEMPLATE_DIRS = (
    './templates',
)
새로 만든 template을 테스트 해보기 위해 urls.py에 새로운 url을 등록해 보자. 이 예제에서는 url 입력 값을 사용하는 예제를 보일 것이다.
$ vi helloworld/urls.py
from django.conf.urls import patterns, include, url
from django.contrib import admin

urlpatterns = patterns('',
    url(r'^$', 'helloworld.views.hello'),
    url(r'^me/([\w]+)/([\w]+)/([\w]+)/', 'helloworld.views.me'),
)
views.py에 새로운 url과 연결될 메소드를 추가한다.
from django.http import HttpResponse
from django.template.loader import get_template
from django.template import Context

def hello(request):
    return HttpResponse("Hello, World!")

def me(request, name, group, role):
    t = get_template('index.html')
    context = Context({'first': name, 'second': group, 'third': role})
    html = t.render(context)
    return HttpResponse(html, content_type="text/html;charset=UTF-8")
이전 버전에서는 content_type이 mimetype 이었는데 mimetype이 삭제되고 content_type으로 변경되었다.
위와 같이 설정 후 다음과 같이 주소를 입력하여 접속하여 보자.
http://10.0.4.50:8000/helloworld/me/warnus/한국/에이스/
모델(Model)
모델을 만들고 임의로 데이터를 넣어 웹으로 확인해보자.
새로운 모델 클래스를 추가하기 위해 helloworld/models.py를 수정한다.
$ vi helloworld/models.py
해당 파일에 다음과 같이 입력한다.
from django.db import models

class Person(models.Model):
    name = models.CharField(max_length=10)
    age = models.IntegerField(default=99)
    city = models.CharField(max_length=10)
    town = models.CharField(max_length=10)
다음으로 위 모델 데이터를 표현하는 template을 만든다.
$ vi templates/person.html
나는 {{ person.city }}시의 {{ person.town }}에 사는 {{ person.name }} 입니다. 나이는 {{ person.age }} 입니다. <br>
url 등록
$ vi helloworld/urls.py
from django.conf.urls import patterns, include, url
from django.contrib import admin

urlpatterns = patterns('',
    url(r'^$', 'helloworld.views.hello'),
    url(r'^me/([\w]+)/([\w]+)/([\w]+)/', 'helloworld.views.me'),
    url(r'^person/', 'helloworld.views.person'),
)
views.py 수정
views.py 를 수정하여 person 에 대한 url 요청이 왔을 때 동작을 명시한다.
$ vi helloworld/views.py
from django.http import HttpResponse
from django.template.loader import get_template
from django.template import Context
from helloworld.models import Person

def hello(request):
    return HttpResponse("Hello, World!")

def me(request, name, group, role):
    t = get_template('index.html')
    context = Context({'first': name, 'second': group, 'third': role})
    html = t.render(context)
    return HttpResponse(html, content_type="text/html;charset=UTF-8")

def person(request):
    p = Person(name='Wooseung Lee', age=30, city='SeongNam', town='Yatop')
    t = get_template('person.html')
    html = t.render(Context({'person':p}))
    return HttpResponse(html, content_type="text/html;charset=UTF-8")
위 소스와 같이 다음을 추가 하여 Person 모델을 사용할 수 있도록 하였고,
from helloworld.models import Person
p = Person(name='Wooseung Lee', age=30, city='SeongNam', town='Yatop')
위와 같이 Person 인스턴스를 하나 생성하였다. 나머지 부분은 render 작업을 거쳐 person.html을 리턴하는 과정이다.


